speedsims
| Basics | Performance | Handling | Suspensions | Final tuning | Example |
Modding NHeat - Physics/Mass distribution

Up to now everything we have edited in physics has been pretty much straight forward. A lot of real life data has found it's way to the simulated car's physics and it was rather simple to put in.

Now we'll focus on those parts that define the car's handling and "feel". And to get this right, we'll have to check the outcome of each change on the physics in the game - which means: testlaps, testlaps, testlaps !

This makes it important to take a good decision about what track to use for testing. At best it should offer all kind of challenges to the car. For testing road racing cars, some midsize track like Nurburgring is a good choice. Hairpins, fast and slow S-bends, fast turns, up- and downhill sections... everything is in.

One of the most important parts in car physics is mass distribution, and it's effects on the car. This is first order made up from these parameters:

TABLE PARAMETER DIMENSION
Table Chassis mass lbs
Table Chassis cm_height in
Table Front/Rear rc_height in
Table Chassis mx, my, mz lbs * (in^2)

mass is easy to set, as this is one of the basic infos that you can find on the web for about any car. Add to the car's netto weight about 150 lbs for the driver's mass and put the sum to physics

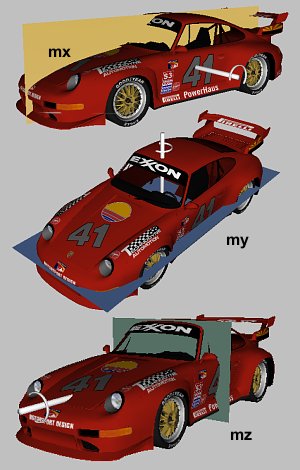
We have precise info about the car's mass, length, width and height - and inertia (= mx,my,mz) is made from these values. For a brick with homogenously distributed mass inertia would have to be calculated like this in real life physics:

  • mx = 1/2 * mass * (length^2 + height^2)
  • my = 1/2 * mass * (width^2 + length^2)
  • mz = 1/2 * mass * (width^2 + height^2)

But WHAT is mx, my, mz actually ? How does it affect the car's handling ?

Let's take a closer, though physically much simplified look at mx.

It's made up from length, height and mass. No width at all in mx; all the car's mass has gone to something that doesn't care about it's width. Imagine that - regarding mx - all the car's mass is located on it's length and height axis like on a flat, 2-dimensional plane. Now try to make this plane rotate around it's x-axis. You'll notice that width wouldn't affect this rotation.

On a car that has most weight on it's front for example (big engine), there'd be less weight on it's back that would try to move to the front on braking. Some higher mx value on this car would "damp" rotational movement of mass on braking - which in same way would be a similar feeling as there'd BE less weight on the back on that specific situation.

mx defines how easy it is to make that flat plane rotate on x-axis. Or how easy you can stop it's rotational movement. If you have big mass on your car, but low mx, you may get overtaken by your car's back on each turn's entry, as on braking there'll be a lot of mass that will try to quickly rotate on x-axis. High mx will slow down that rotation; the car 's handling will become less delicate on braking

my and mz work in exactly the same way, just for different rotation axis.

  • mx has major impact on how the car feels at braking and accelerating (turn entry/exit understeering/ oversteering).
  • my affects how agile the car is on turning/sensivity on steering
  • mz affects the car's roll ability in first order and how much it's mass wants to run straight IN a turn.
Setting mx,my,mz in Heat is rather a matter of "guesstimation" and testing than calculating, even if we know the car's mass and dimensions. Scientific approach doesn't help much though; NHeat doesn't use exact physics on this matter.

Some algorithm to get a first draft is helpful nonetheless:

  • mx = (1/2000) * mass * (n1 * (length^2) + n3 * (height^2))
  • my = (1/2000) * mass * (n1 * (length^2) + n2 * (width^2))
  • mz = (1/2000) * mass * (n3 * (height^2) + n2 * (width^2))
where n1-n3 are correctional factors (~ 1) to take the fact into account that a racecar doesn't have the shape of a brick, nor is it's mass homogenously distributed in most cases.

Up to now we only have told Heat how MUCH weight is has to shift on rotational movement. But since mass isn't homogenously distributed on the car's body, we'll want to set WHERE the mass is placed. And which way it rolls.

In real life physics (and in Heat too) the movement of any object can be calculated from assuming it's mass being located in a single point: it's center of mass. Any object will act like it's mass actually IS located ONLY in this center of mass. Now Heat only has a parameter to set

  • cm_height = height of center of mass = y-position of center of mass
But we would want to define it's longitudinal position (pos on z-Axis = length) as well. But there's no parameter in NHeat physics for this

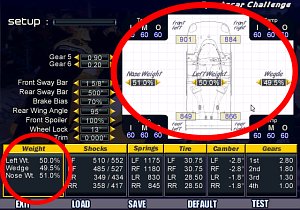
If you take a look at Garage screen, you'll immidiatly see that Heat has already taken care of this. Heat automatically sets longitudinal position of the center of mass to the center of the car.

You can move the center of mass' x- and z-position by adjusting it in Garage, not in physics.

Now cm_height has a close relationship to front/rear rc_height and it is important to take care of these at the same time.

If the car turns, it's center of mass rolls around the axis that is made up from front and rear roll centers. So defining this axis' angle and height has big impact on the car's handling. Even more important is how much above that roll center axis cm_height is located

  • front rc_height < rear rc_height = more oversteer
  • front rc_height > rear rc_height = more understeer
The distance from rc_height axis to cm_height determines how MUCH roll there will be. If you set cm_height much higher than rc_height axis, the car will flip over in turns. If you set cm_height too close to roll center axis, the car will feel like dead (no/little FF effects).

Modding NHeat - Physics/Tires

Even more important as mass distribution to get the car feel right is tire physics. If you mess up tires physics, perfect car body physics won't compensate - though it's quite popular to simply add a lot of downforce to car body to compensate crap tire physics

There's 20 (!) parameters that define tire physics in Heat, and each of these can be set for front and rear tires seperatly.

TABLE PARAMETER DIMENSION
Table Front/Rear width mm
Table Front/Rear mass lbs
Table Front/Rear moment  
Table Front/Rear aspect  
Table Front/Rear frict_k1 / frict_k2  
Table Front/Rear frict_load1 / frict_load2  
Table Front/Rear friction  
Table Front/Rear resistance  
Table Front/Rear long_frict multiplier
Table Front/Rear stiff_c1 / stiff_c2  
Table Front/Rear stiff_load1 / stiff_load2  
Table Front/Rear long_stiff multiplier
Table Front/Rear magic_b/c/d/e  

Tire width is the tire parameter, that can be easiest set. Try to get info on the web what width front and rear tires have been/are used on the car that your simulated model refers to and put that values to Heat

Since we already have set tire_diameter before, we have all the info we can get to "guesstimate" tire mass and moment. By the way: moment is nothing else but the tires' inertia regarding x-axis = mx

  • mass = tire_diameter^2 * PI * tire_width / density
  • moment = (1/2 * mass * tire_diameter^2) * 1/20
We can calculate the tires' volumina by simplifying tires to cylinder objects that have homogenous mass distribution, but we would need to get info about that cylinder's density. Or we could make some guesstimations. Or just try to get tire weight info from the net. Once we have set mass, we can easily deviate the tires' moment.


Now for the more interesting parameters.

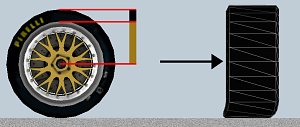
Not just alphabetically the first to name would be aspect, which sets the relationship of tire shoulder height and rim diameter (physically, not graphically !)

aspect has massive impact on the tire's flexibilty to lateral movement. The higher aspect is set, the more flex the tire will have
- and thus more lateral grip

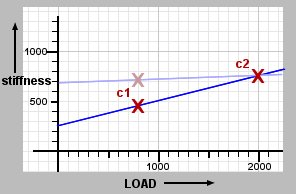
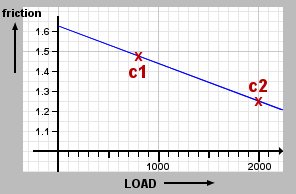
ONLY the tires' lateral stiffness is set by parameters stiff_c1, stiff_c2. They come along with correspondend parameters stiff_load1 and stiff_load2. Heat makes up a linear function from all those parameters, which defines lateral stiffness for any given load on a track.

Simplified you could take the tuple stiff_c1/stiff_load1 for the definition of the tires' stiffness on turning slow, while stiff_c2/stiff_load2 sets lateral stiffness on turning fast

Be aware that on changing any of the c1/c2 values, you don't only change THAT single value. By increasing stiff_c1 for example, stiffness on loads > stiff_load2 will automatically be decreased, while stiffness on all loads < stiff_load2 will be increased as the curve's angle is changed

long_stiff sets the tires' stiffness for longitudinal movement. It is defined as multiple of lateral stiffness. So if for example you set long_stiff 2.0, you'll get tires that have twice as much longitudinal as lateral stiffness

Setting low stiffness values will make for a better "feeling" of the car's weight in turns - and less skidding. But the borderline's steepness from grip to skidding will increase, and thereby make skidding less controllable. High stiffness values will make for faster loosing grip in turns, but more control - and thus faster steering. The tires' stiffness is very important to set right, as it has major impact on the overall "feeling" of the cars and how much FF effect there will be on each situation of driving


Defining the tires' friction works pretty much the same way as setting stiffness.

The tuple frict_c1/frict_load1 defines how much the rubber sticks to the road surface on rather slow lateral movement, while frict_c2/frict_load2 does the same for turning fast.

long_frict sets the tires' friction for longitudinal movement. It is defined as multiple of lateral friction. So if for example you set long_frict 0.5 , you'll get tires that have half as much longitudinal as lateral friction

The parameter friction doesn't affect grip, but how fast the tires will heat up.
resistance affects how much longitudinal friction will affect the car's acceleration and speed

So much for the straight forward part of NHeat's tire attribute :)


But there's even more to it, as Nheat allows for defining tire compound attributes as well.

TABLE PARAMETER DIMENSION
Table Front/Rear magic_b  
Table Front/Rear magic_c  
Table Front/Rear magic_d  
Table Front/Rear magic_e  

NHeat's tire model is based on Pacejka's Formula, which is a standard for tire physics models. It's used in most race car simulation, not just games. There is a great tutorial for Pacejka's Formula over there at RACER, a freeware race simulator. Another (scientific) publication to get a basic understanding of how it works can be found here a

Basically Pacejka's formula is

y(x) = D sin[ C arctan { Bx - E ( Bx - arctan(Bx))}]

where the variables D,C,B,E are "magic numbers". Adjusting these "magic numbers" alter the modeled tire compound's characteristics. Some useful reference for how to work on the magic numbers can be found here.

By playing around with compund definitions, you should always only adjust one magic number at the same time, unless you have a very good understanding of what you're doing - and you should change the numbers only in very small steps (+/- 0.1 or 0.01)

In NHeat the magic numbers of Pacejka's Formula are

  • magic_b ( ~ 0.7-0.8, +/- slip angle)
  • magic_c ( ~ 1.1-1.5, +/- grip on sliding)
  • magic_d ( ~ 1.0, +/- overall grip)
  • magic_e ( ~ -0.2)
This is only a very rough description of how these numbers work in NHeat, but since there's no manual which way exactly the devs have implemented Pacejka's Formula, there can be no more than just estimations, trial and error

Modding NHeat - Physics/Downforce

We'll now turn on some critical parameters. They are all about downforce and almost an invitation to mess up the car's physics. Downforce can easily be used to "iron out" all bugs on mass distribution and tire physics - just increase downforce and you're fine.

Well, almost, as you will just cover the flaws, you won't fix them this way.

To avoid running this dead-end street, up to now all testlaps should have been run on a car that had no downforce at all. Take care on this ! At best, you should have set down torque and power as well as this would enable you to get a better feel for the car's handling

Downforce in Heat is handled as negative lift. Kind of weird, as usually cars don't lift (hopefully). There's downforce to be set for the car's body, front spoiler and rear wing

TABLE PARAMETER DIMENSION
Table Chassis cp_height  
Table Chassis cp_long  
Table Front/Rear front_lift  
Table Chassis fspoiler_lift  
Table Chassis rear_lift  
Table Chassis rspoiler_lift  

Downforce presses the car to the ground; that pressure increases with increasing speed. Whcih means that at very low speed your car won't have any notable downforce at all, even if you have put in high negative lift values. Slow speed handling of a car is scarcely affected by downforce !

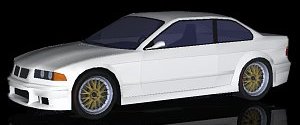
The type of car you edit physics for already determines downforce. Some city car (Fiat 500, VW Beetle, Smart, etc) usually doesn't have any downforce at all, so you could safely set zeros to all those lift values.

No rear, wing, no front spoiler, no diffusor, no other aerodynamic tricks = no or almost no downforce on this car.....

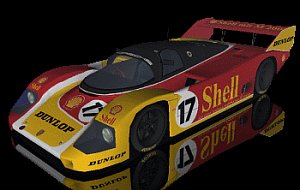
... while there's a lot of downforce on that one. Groundeffect bottom, diffusor, big rear wing, front spoiler, aerodynamic top will make this car stick to the road at high speed

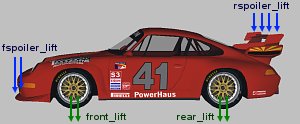
Add some diffusor to the car and you'll get body lift (front_lift/rear_lift). Add a rear wing to put in rspoiler_lift. A front_spoiler will provide for fspoiler_lift.

Take into consideration that

  • negative lift value = downforce !

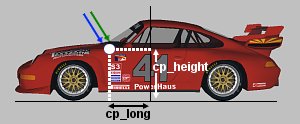
Additionally to how much downforce the car's body will provide for, Heat needs to know WHERE exactly to apply it. Alike the center of mass, Heat physics use a center of pressure to locate where to put downforce to the car.

This seems to be a little weird, as the center of pressure already would be determined by how much downforce is applied to rear and front. Kind of at least, as Heat still wouldn't know how far away from the car's center front spoiler and rear spoiler are for example - or what height they are.

To define the center of pressure's location, set cp_long and cp_height

Both cp_long and cp_height are great to use on fine tuning the car's high speed handling, so always remember to check on the track what change to the car's handling your changes to any parameter have caused.

Typically any lift values will be > -2.0 and < 0.0 Any lift value < -1.0 should be considered to be remarkable high downforce already.

[ Physics: Handling ]